How To Manually Face Tag People In Google Photos: Who doesn’t love to take pictures and videos with their smartphone in every memorable event of their life, may it be a birthday bash, a coffee with friends, or a relaxing weekend with your family?
While all the clutter in your phone’s photo gallery can get overwhelming, Google Photos is just the right AI-based cloud storage service that you need. It is straightforward and intuitive, packed with features that help in organizing, managing, and storing photos and videos.
It can categorize and sort all your photos into albums and create animations and collages. Not to forget its most talked-about feature which enables its users to revisit the memory lane every now and then.
Your photo OCD? Sorted!
One of the key features of Google Photos is that it automatically detects and tags faces, saving us from the tiresome task of scrolling through years-old pictures to find the important ones. Until recently, users could only label those faces that were automatically detected by Google Photos. It would recognize similar faces and create a separate group for each one, giving you easy access throughout your photo library.
Thanks to the latest modifications, users are now able to face tag just anyone in the photos on their own!
Hot move, Google Photos!
How to Manual Face Tag in Google Photos?
There was a lot of buzz on the internet about Google Photos rolling out its one-of-a-kind feature, Manual Face Tagging. Its fans were excited since they could now effortlessly label any of the faces of their favorite people and pets that the Google Photos algorithm couldn’t detect.
But not so fast!
If you were thinking that this new feature would let you point to any part of an image and let you add a tag to it, there is a twist.
Google Photos face tagging still largely depends on its algorithm and its potential to capture and recognize faces, be it of a person or a pet.
In case the app detects a face of a person who is not yet categorized in your Google Photos profile, the manual face tag feature enables you to add a new tag or edit the previous ones.
There can be images where there are other people, but the Google Photos app cannot detect them or differentiate them from the surroundings due to an unusual angle. In such cases, the app does not allow you to add a tag.
Sounds exciting and want to know how to do it?
Here are the steps you need to follow to be able to manually face tag people on Google Photos.
How To Do It: Step-by-Step
All you need to do is open the Google Photos app and follow the given instructions given here.
Activate The Face Grouping Feature:
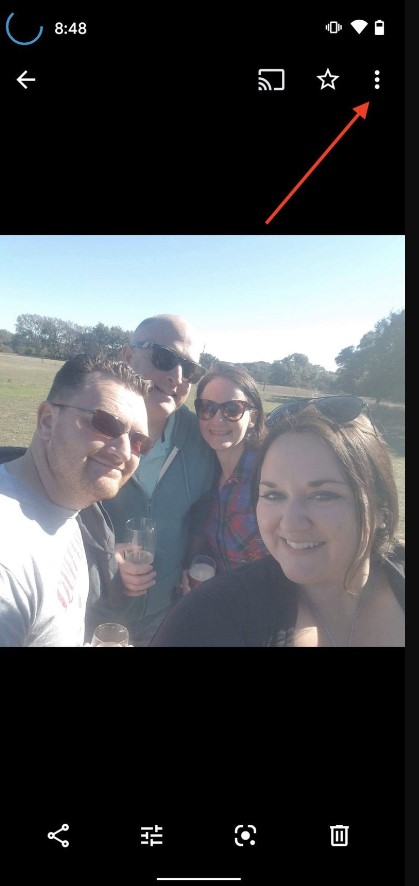
Tap on the Menu option. Look for the 3 dots present in the left-side corner at the top.
Select Settings
Click on “Group Similar Faces”.
You can turn face grouping on or off at this point.
For Smartphones:
Select the picture which has people or any pets you want to create new tags for.
Swipe up on your screen until you can see the images of all the people present in the picture. Those people whose albums already exist in your library will be seen with their names below their images.
To name a specific face in the group, scroll through all the thumbnails and locate it.
Tap this thumbnail.
Select the option “Add a name” and give a name to that person.
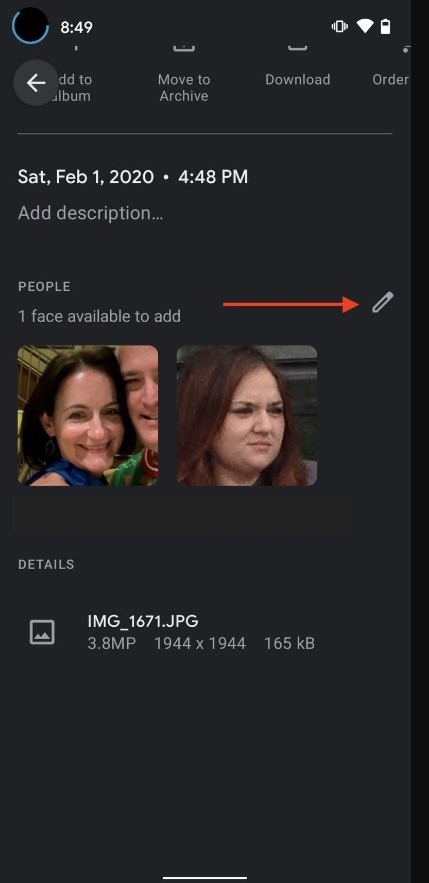
If there are people in the photo who are not a part of the automatically created groups, click on the pencil option present on your thumbnail.
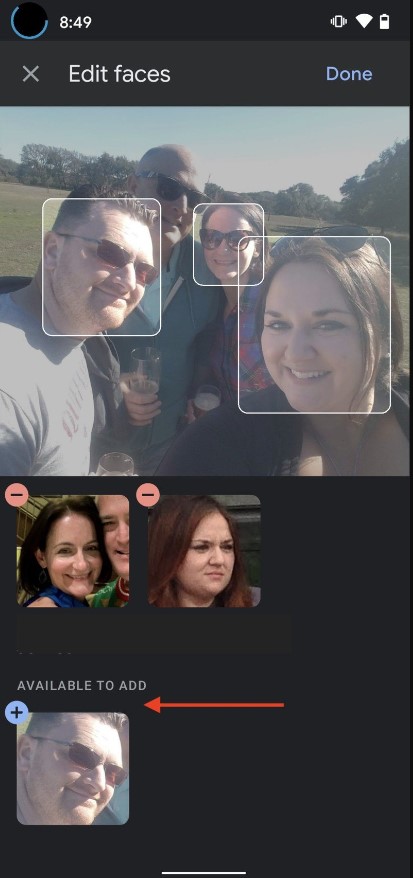
Keep scrolling down until you can locate that face. This can be seen under the heading “Available to add” and can be seen with a blue colored Plus (+) sign on the top left-side corner.
In case a face is incorrectly labeled, tap on the minus (-) sign to fix or remove the tag.
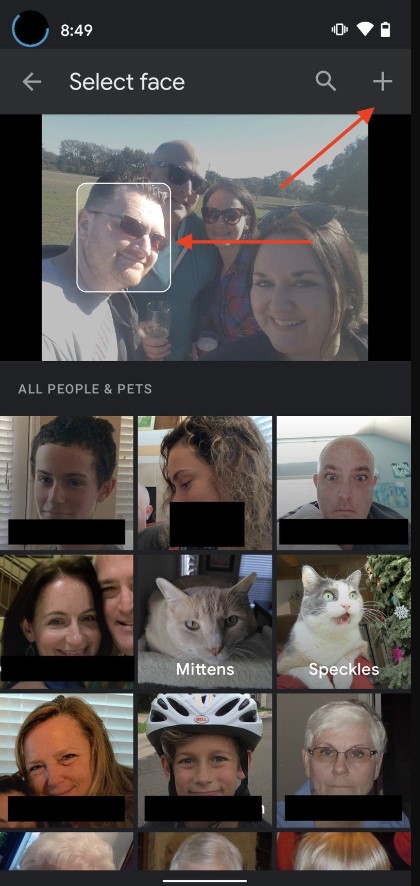
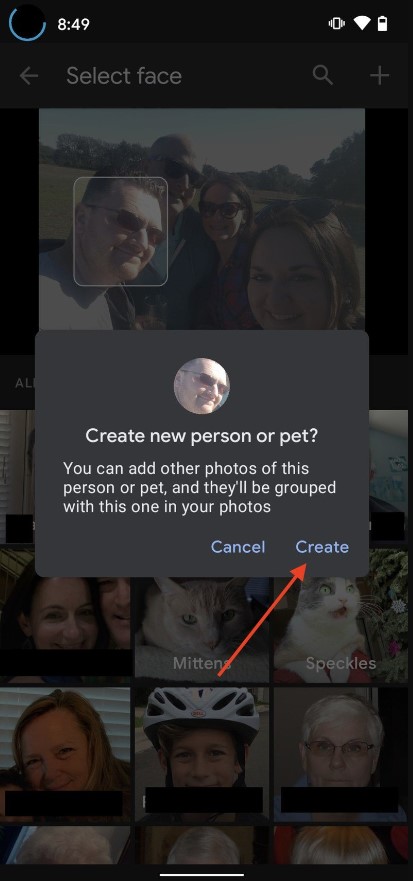
Tap that face.
Touch the Plus (+) sign which can be seen in the top right-side corner.
Tap the option “Create”.
You will be able to see the new face along with all the other faces below your photo.
Tap this image and give it a name.
On a PC:
Open the Google Photos app.
Select the image of your choice.
Click on the information icon present on the image. (Find a small “i” inside a circle.)
This will open a section listing all the people groups already existing on your profile.
If Google Photos is able to detect any faces of people or pets in the picture that are not yet tagged, you will be able to see how many people you can create new groups for.
On clicking this notification, you will be able to click the face thumbnail.
Click on the Plus (+) sign.
Tap on the “Create” button.
Tap “Done” to come back to the information screen.
Though Google Photos would not let you take full control over tagging your loved ones, people and pets, in your library, you cannot deny the fact that this feature makes it easier to locate pictures. It is undoubtedly a step closer to systematically organizing your data.
The manual face tag feature of Google Photos enables its users to provide a personal touch to their most personal belongings, images, and videos, by allowing them to select people who are most important to them.
Just by following a few simple steps, your Google Photos library can become much more convenient, hassle-free, and organized.
So, do try it out.
Simply Put
Though Google Photos would not let you take full control over tagging your loved ones, people and pets, in your library, you cannot deny the fact that this feature makes it easier to locate pictures. It is undoubtedly a step closer to systematically organizing your data.
The manual face tag feature of Google Photos enables its users to provide a personal touch to their most personal belongings, images, and videos, by allowing them to select people who are most important to them.
Just by following a few simple steps, your Google Photos library can become much more convenient, hassle-free, and organized.
So, do try it out.

 And it’s done!
Read More Article
And it’s done!
Read More Article